How to make a comic book

My very first Comic Book that I fully illustrated
So. You’re looking to make comics, eh?
That’s fantastic! The world can always do with more wonderful creatives like yourself. I’m happy to welcome you into the community with open arms!
Now,
The big question; Where do I start?
The simple answer; With an idea!
It can be anything. However, I suggest you start with something relatively simple. With Black Market Heroine, Russell knew the title before he knew what the story was going to be. With My Grandma is a Demon Slayer, we knew we just wanted to have a badass Grandma slaying Demons. The idea can be as simple as that. From there, you begin outlines for your scripts.
The easiest way to go about outlining is to plot out your beginning, middle and end. Then you can work your way in between those beats as you see fit.
Here’s an example of an outline using an old comic idea of mine:
(GEORGE SMITH PARANORMAL INVESTIGATOR OF THE PACIFIC NORTHWEST)
Beginning: George Smith moves to the Olympic Peninsula.
Middle: George’s daughter goes missing under mysterious circumstances.
End: George is reunited with his daughter.
Very simple start. It can help keep you and your story on track. Of course you can get more detailed with the planning. If you want more information on how to write a proper script outline I’d recommend “Save the Cat” by Blake Snyder. But for now, I think this method is a great way to just get on it and get started!

The next step would be to write the script in its entirety. If you’re an artist, you could honestly completely skip this step and just go directly into thumbnailing. However, I do think the more thorough you are, the better your story will turn out. As it is a lot easier to change or fix things in text than it is when you begin laying out pages.
Format for scripting is our next topic. There are lots of ways to go about this. Some people will be incredibly detailed in their descriptions of what they want to happen and some people will leave interpretation up to the artist.
If you’re a writer only and you plan on hiring an artist, my biggest suggestion is to break pages down for your artists. It helps both parties to know how many pages there are in a book and how many panels on each page.
Here is an example;
Page 1:
Panel 1:
Wide Shot of George’s car on the highway. There are beautiful mountains and trees zooming past. SFX: Musical notes as he is listening to the radio.
Panel 2:
Cowboy shot (Waist up) of George looking up out of his window in awe. Thought Bubble: I can’t believe I’m finally here.
Panel 3:
An action shot of a large shadow creature crossing the road. Speed lines surround it as it’s running.
Panel 4:
Close up of George’s face twisted in horror. SFX: GASP
Panel 5:
Small pop out panel of George’s foot slamming on the brakes.
Panel 6:
Wide shot of George’s Car coming to a screeching halt. SFX: SCREEEECH!!
A few small rules here too while we are on the subject of breaking pages up.
Break dialogue up as much as you can. Cramming paragraphs of text into panels is a bad idea in both writing and from a visual standpoint. There won’t be enough space in your panels to tell the story. SHOW DON’T TELL really matters in comics. (Contrary to what anime might have you believe)
Another thing… avoid cramming too many panels into one page. I think 8 panels is the absolute desperate max that I fit into one page. But on average 5 to 6 panels is relatively healthy. Keep this in mind for pacing as well. You’d be surprised how much of an effect panel placement has on storytelling. However, I won’t get too much into that as that is a whole other lesson in and of itself.
Our next step would be to start thumbnailing. You don’t have to be an artist to do this step. It is mostly to get a feel for pacing as well as character and dialogue placement. Squares, stick figures and bubbles work just fine. Here’s an example of how I put together my thumbnailing:
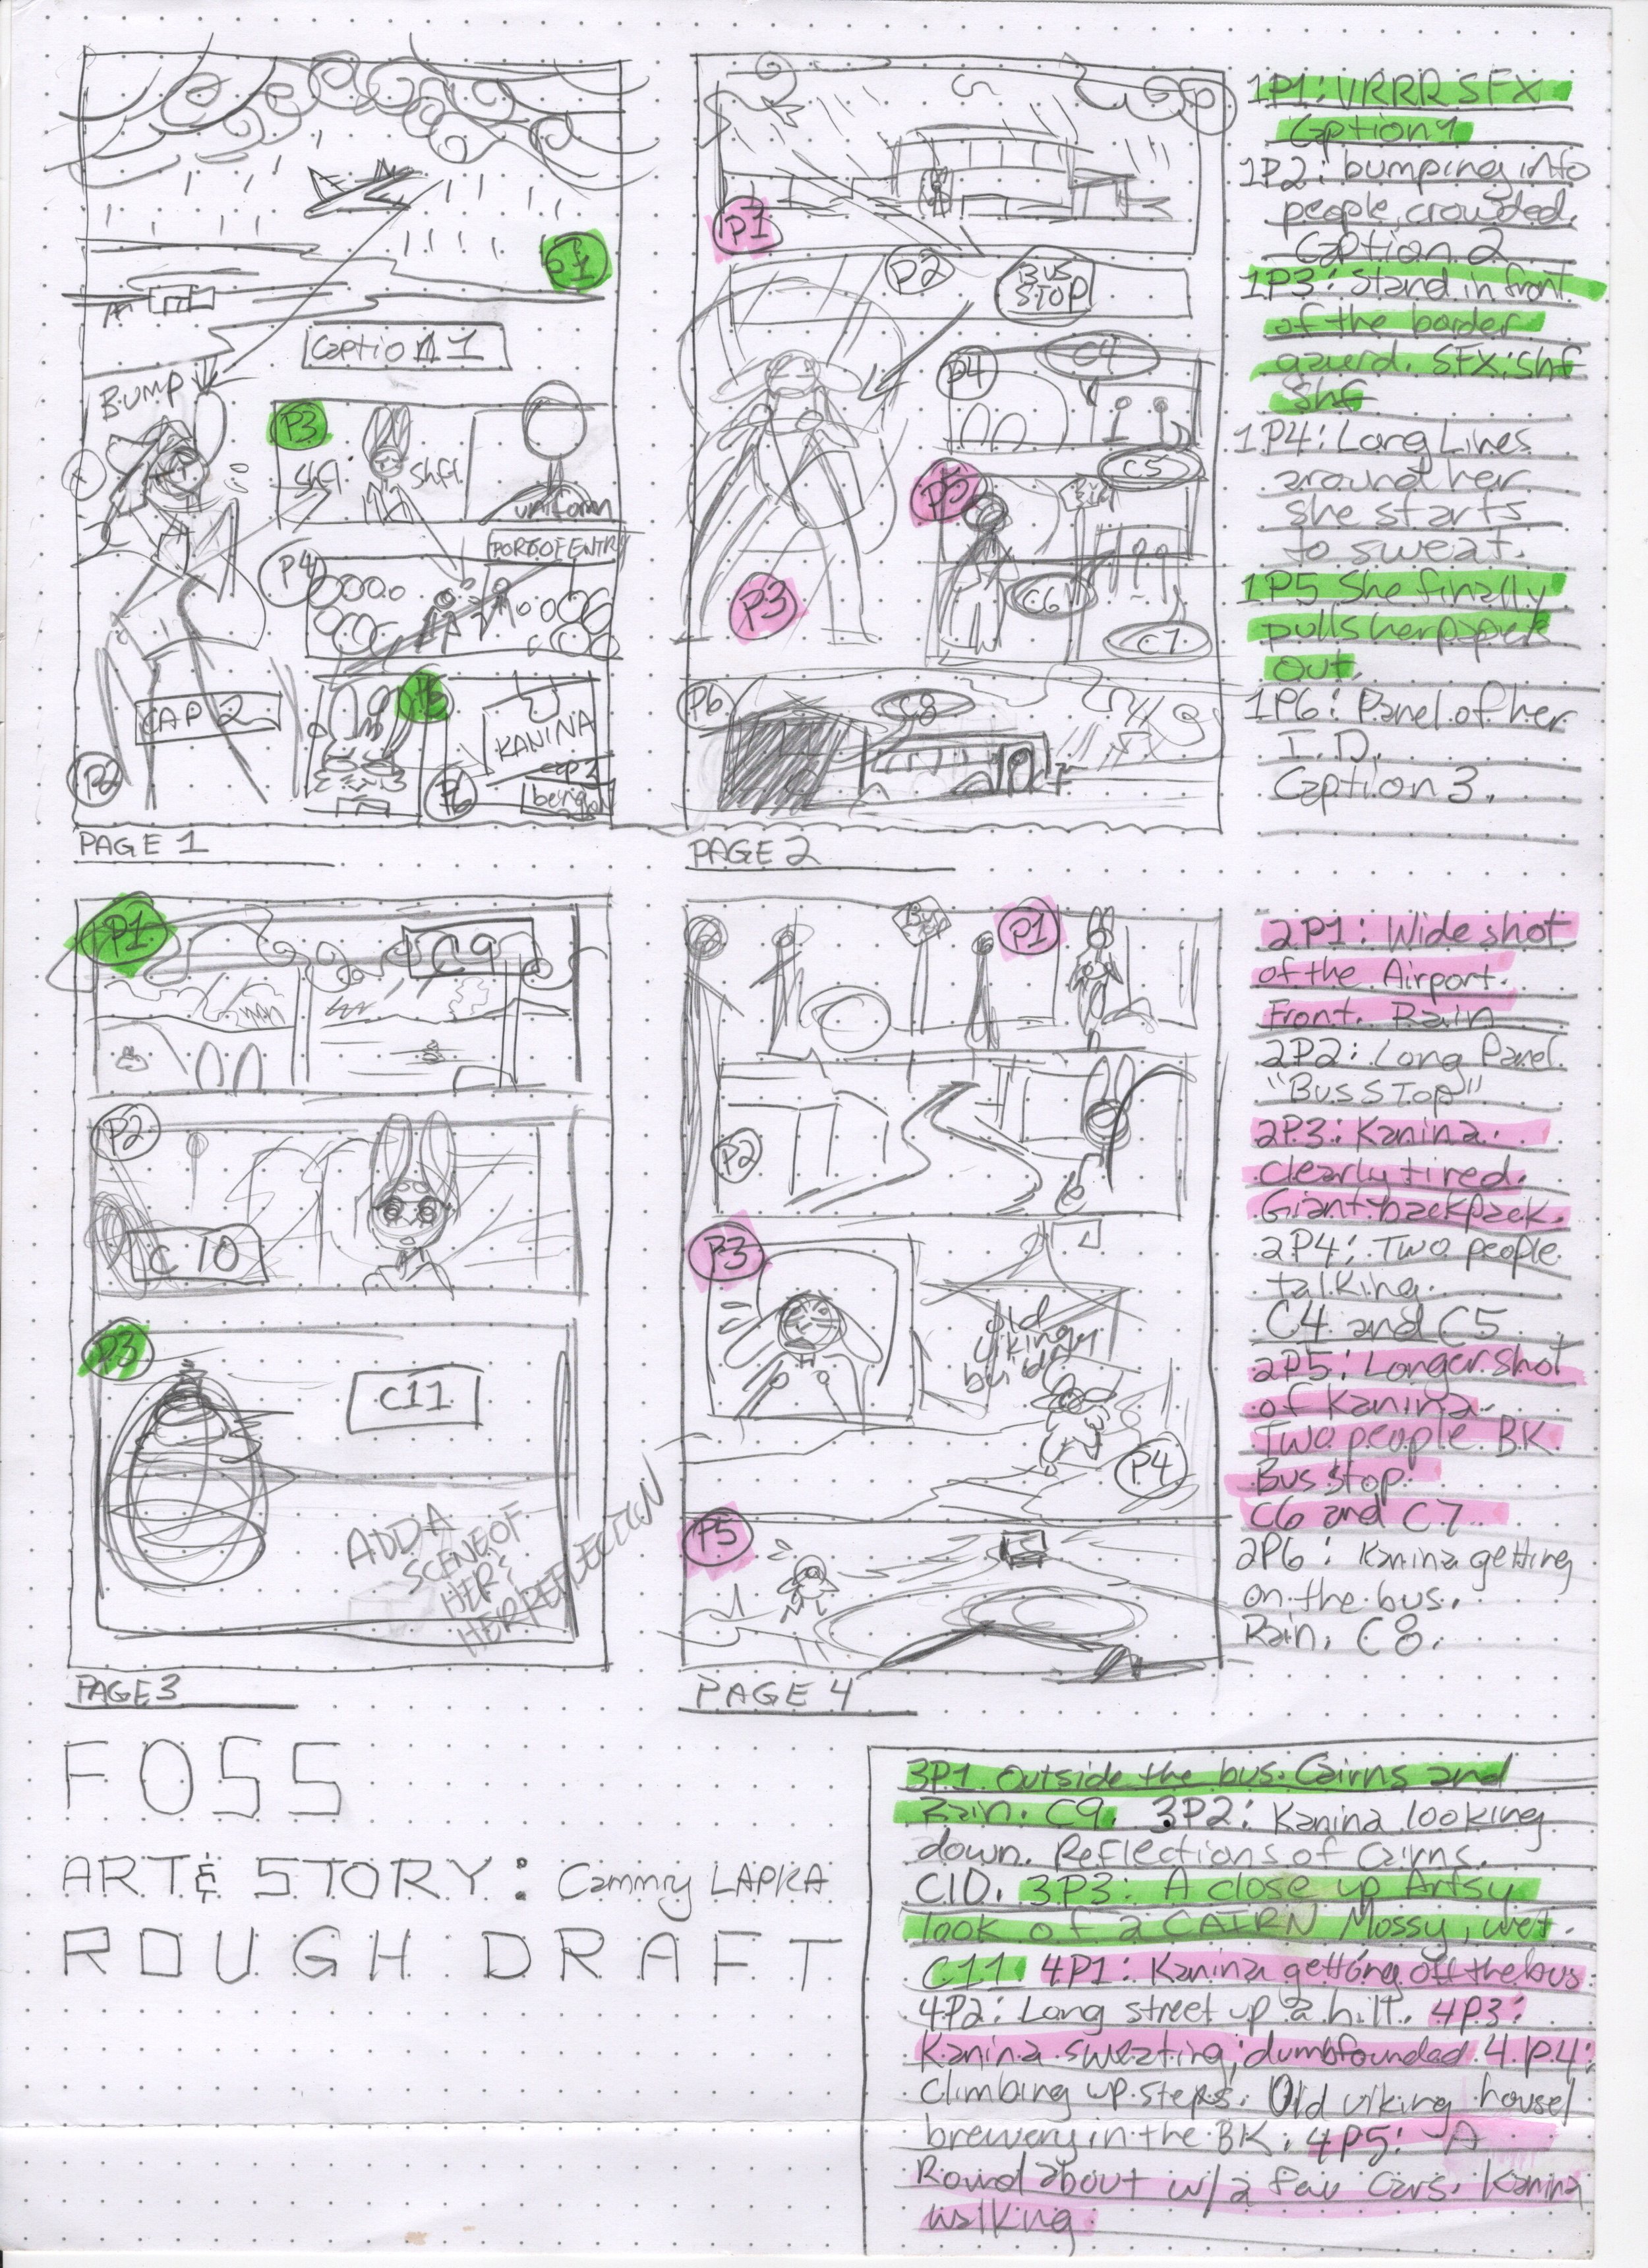
Thumbnails for my book FOSS. I actually have this template available here on my patreon. I also have a thumbnailing package available on my shop for $2.75 a page.
You can see I provided breakdowns on the side here. You aren’t required to do this but it can help with deciphering your scribbles if you end up not being sure what they were in the first place! (I know that feeling all too well!)
Congrats! You now have the skeleton for a comic book. Doing these steps thoroughly will create a solid foundation for the next steps.
If you’re a writer looking to hire an artist; please do your research and due diligence on any artists offering cheap rates. I’ve heard far too many stories about writers getting scammed out of money and left in the dark on where their stuff is at. It’s not fair to you and it’s not fair to the artists who genuinely work hard to produce quality work and, in turn, get a bad rap because of the bad apples.
At some point I’ll create a directory of trusted independent artists I recommend, but for now I will shamelessly plug myself as it can be expensive to hire artists. I, however, offer affordable payment plans and can help direct you if you need any kind of help with production.
If you’re an artist looking to create your own comic. You’ve got great start! Once you have thumbnailing done, you can now begin sketching your pages. I usually sketch a page and continue with lineart and color page by page. But some people will sketch all the pages and then go through and lineart them. The page-by-page method works for me since I can see results faster and it encourages me to continue with production rather than burning myself out trying to get all the sketches done in one go.
Note: I am almost exclusively a digital comic book artist. So most of the advice I have from here on out are all based on digital standards. If you want a more detailed walkthrough on how to create comics physically I 100% recommend Drawing Words and Writing Pictures by Jessica Abel and Matt Madden.
If you’re curious what I use, I own an IPad Pro (12.9”) 5th generation and use Clip Studio for all of my comics.
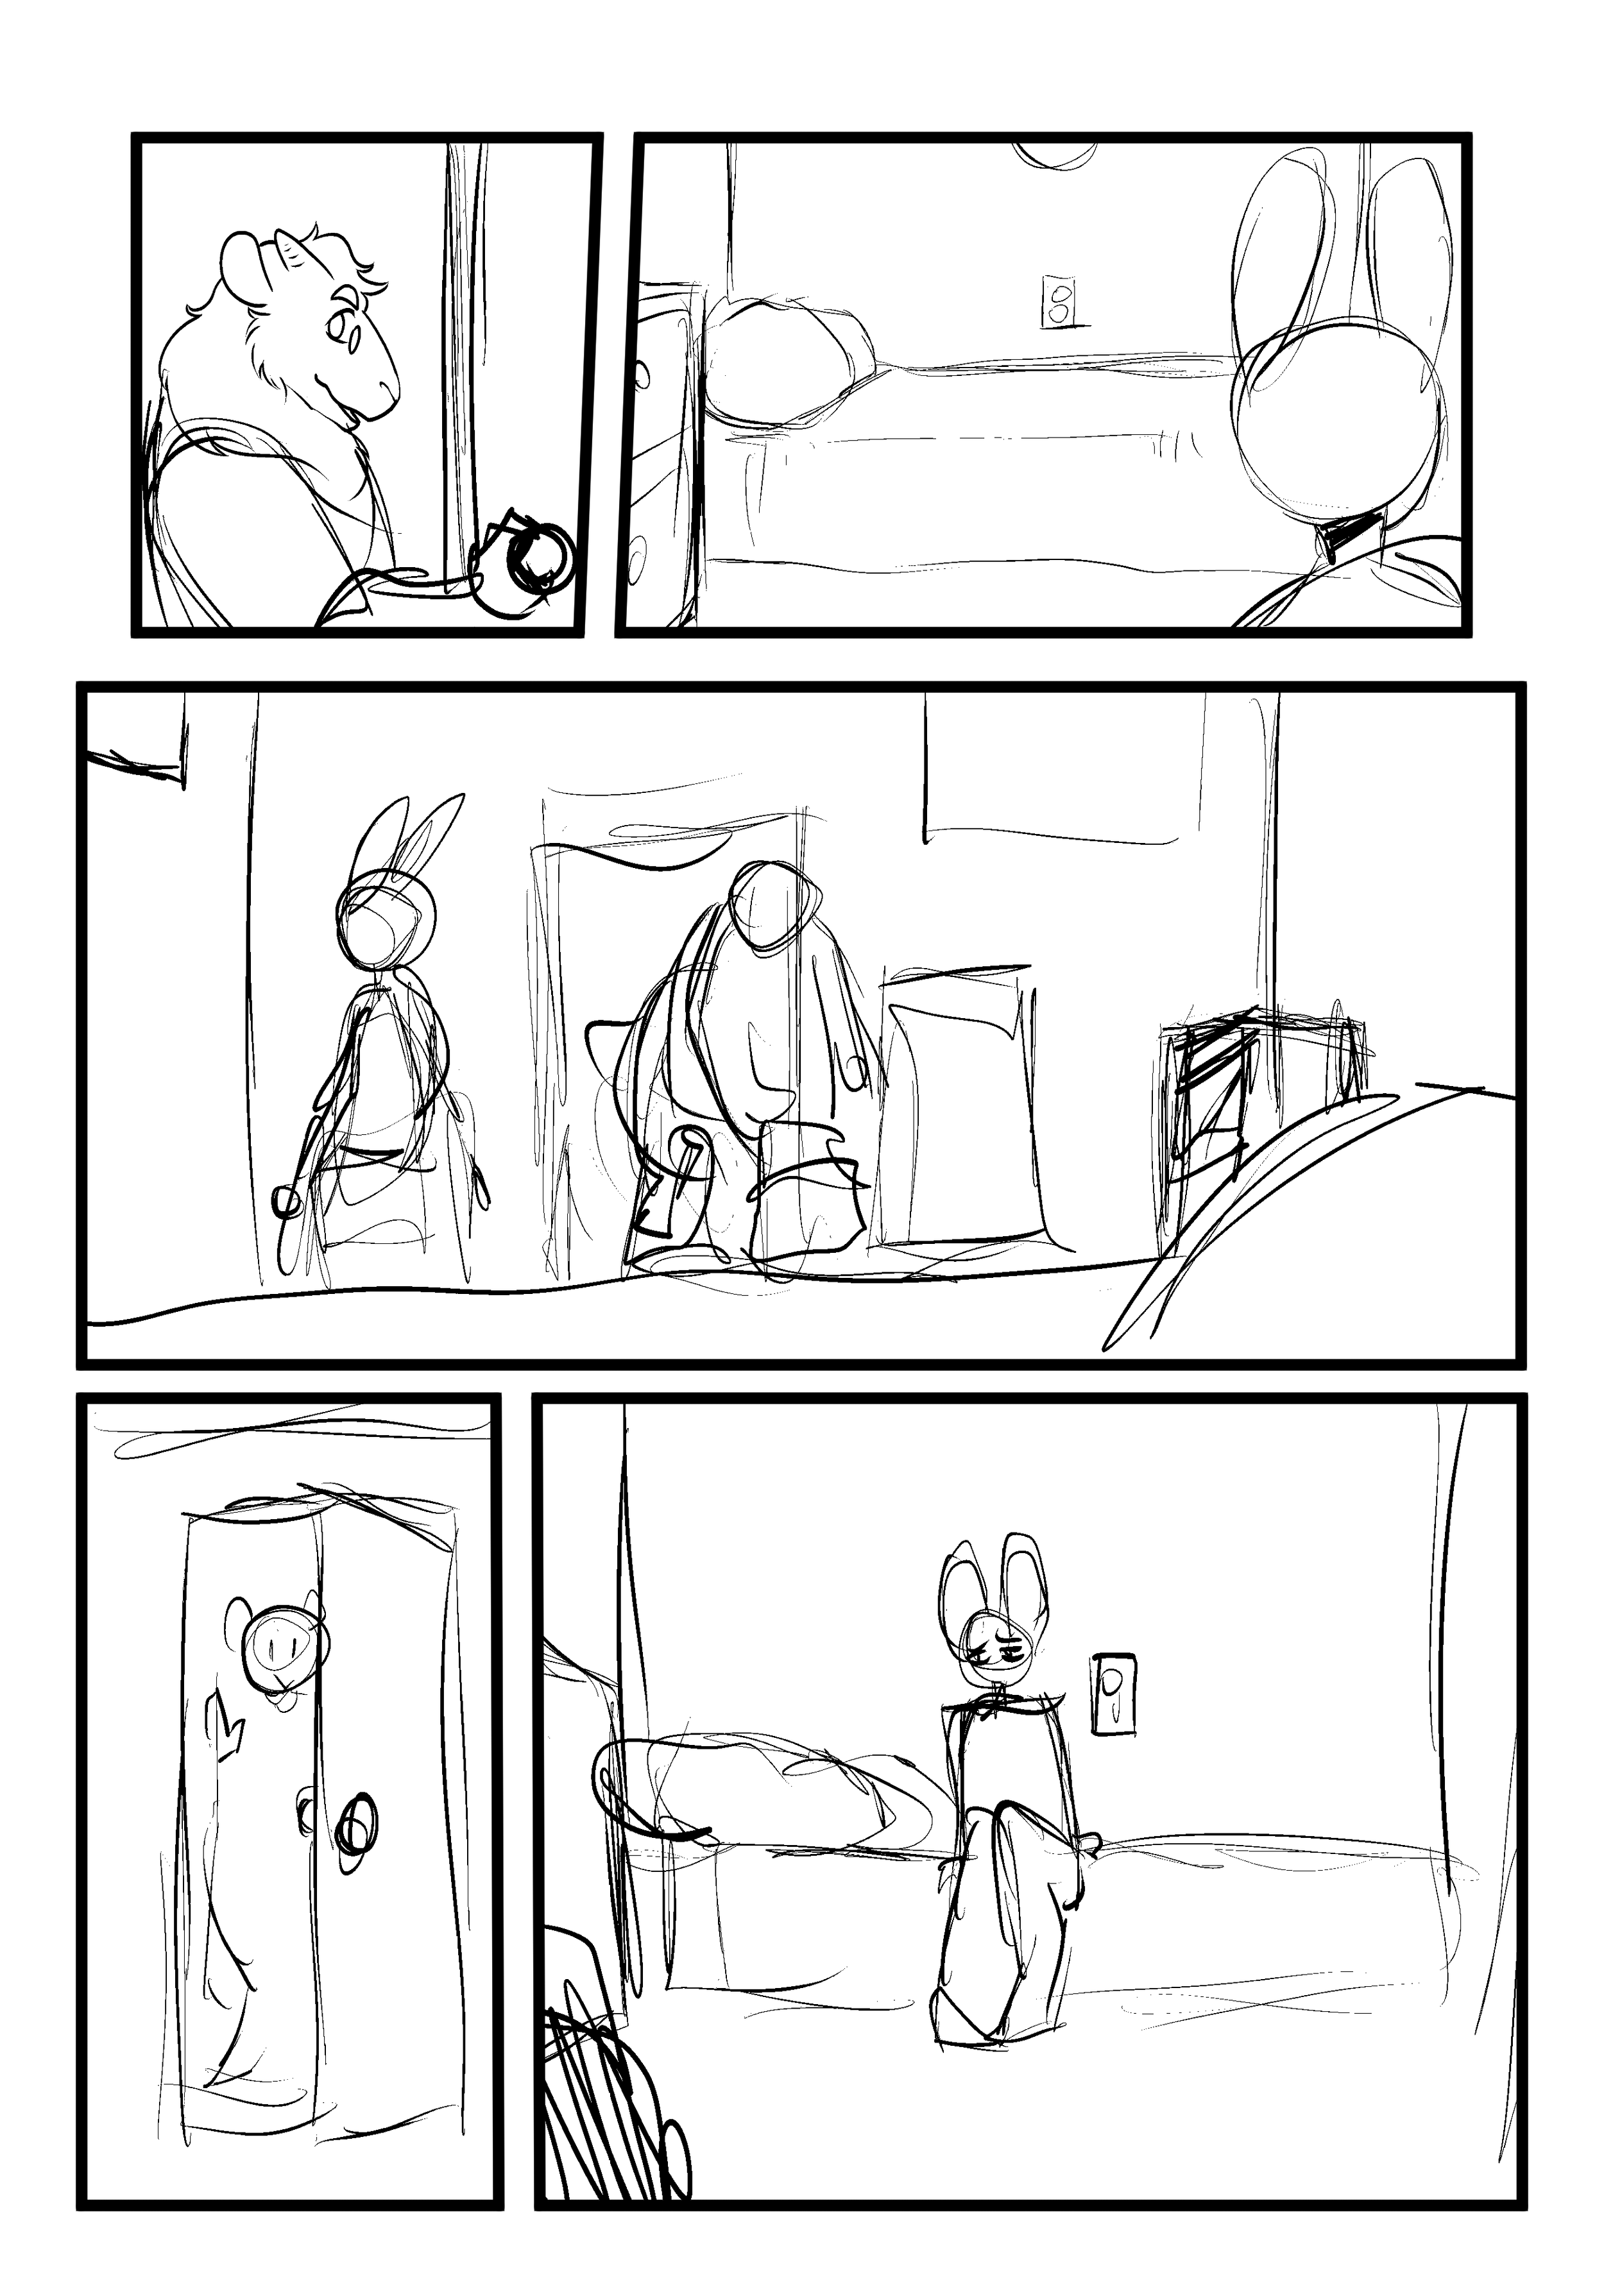
Example of my Sketched Pages in FOSS.
Keep in mind you will have to consider what you’re printing your comic book at before. The standard size is 6.625” x 10.25” with a half inch margin. DPI should be at least 300. I like to work at either 350 or 400 just in case things need to be resized. Better to have a higher resolution than a lower resolution if that needs to happen. Do keep this in mind before you start actually producing pages.
Now, sketches are meant to be loose. They are more detailed than thumbnailing, however, they shouldn’t take you forever to do. I think a lot of people get nervous about putting pen to paper since they want it perfect on the first try. That’s sadly not how artwork works. The people who can do that have trained their muscle memory to the extremes. And more than likely they’ve planned out their pieces beforehand in some way shape or form. Honestly, just throwing lines out there and then refining it layer by layer is the best method I’ve found to getting things just right. This is what the next step is, essentially. It may be time consuming but that’s just what it is to be an artist. Your time in exchange for creation! Keep redrawing until it feels right to you.
Another piece of advice for artists trying to keep up on consistency with comics is to keep character turnarounds handy.

My Character Sjalfa from my book FOSS.
Coloring and Lettering are the next steps. I honestly like to hire these parts out as an artist. I enjoy coloring but it is far too time consuming if I’m trying to do quick comics for clients. Color theory is also a whole other lesson in and of itself so I’d recommend studying styles of color you enjoy and get familiar with the color wheel. Same with Lettering. There is so much that goes into both of those. I hardly ever do lettering since it’s not something I enjoy doing. So I just hire that part out. Again, I think I’ll put together a list soon of good independent artists, writers and letterers you can hire out.

Finished Page of FOSS with lineart, colors and letters by Me, Nicolas Touris and Micah Myers.
The last steps are finding funding, printers and/or publishers. A lot of the independent creators in the community use kickstarter as a means to fund their projects. Self-publishing is another option but can be costly. It takes a lot of investment both financially and mentally. You’ll be doing a lot of the footwork that publishing companies do for you. But, you will ultimately have more control over your own franchise.
If I’m honest, I should probably listen to my own advice with a lot of these things. Though, I think that’s the beauty of entering a field professionally is that it really provides a lot of opportunities to learn and grow. Making connections and having an open mind is key to being successful. You’ll always have flops and failures but everyone has those. So don’t be discouraged, be stubborn with your ideas and most importantly have fun.
I hope you found this helpful. If you have any other further questions or simply want to reach out you can always email me at cammrylapka@gmail.com.
Good luck!